Heat.net Store Home
|
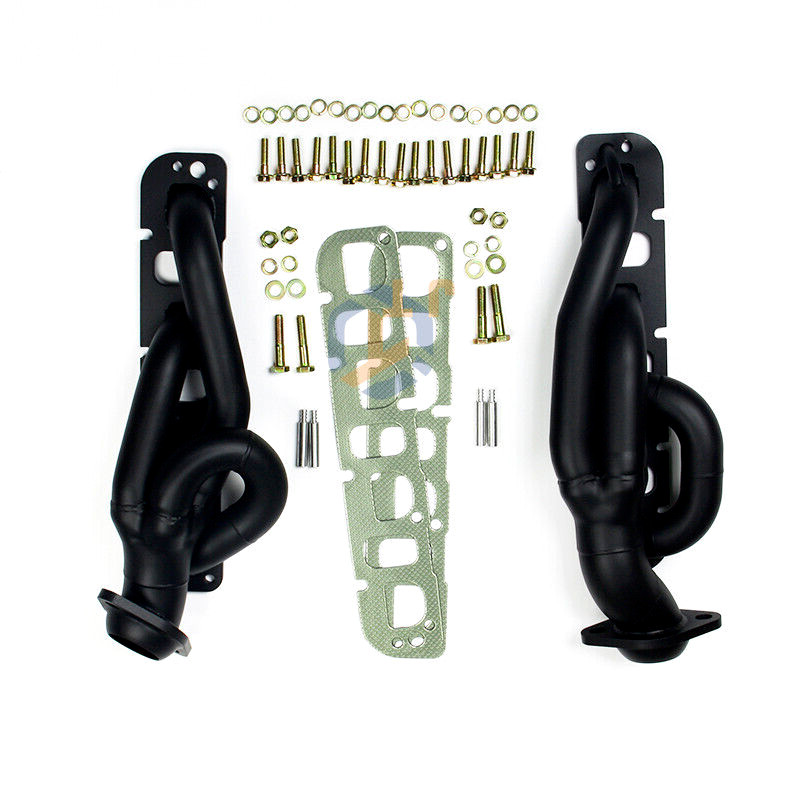
FOR 09-23 DODGE RAM 1500 V8 5.7L 2WD 4WD BLACK CERAMIC COAT SMOG HEADERS For Sale

When you click on links to various merchants on this site and make a purchase, this can result in this site earning a commission. Affiliate programs and affiliations include, but are not limited to, the eBay Partner Network.

FOR 09-23 DODGE RAM 1500 V8 5.7L 2WD 4WD BLACK CERAMIC COAT SMOG HEADERS:
$330.00
APPLICATION:
- For Dodge Ram 1500 2WD 4WD 5.7L Hemi V8 2009-2017 (2019-2023 Classic Models)
- Caution! 19-23 applications passenger side has different flanges, need to cut and rotate the header flange
TECH SPECS:
- HeaderType:Shorty / Short TubeSMOG
- Primary Diameter:1-5/8 in. (42mm)
- Collector Diameter:2-1/2 in. (64mm)
- Head Flange Thickness:3/8 inches (9.5mm)
- Pipe Thickness:16 gauge (1.5mm)
- Material:304 Stainless Steel
- Finish:Ceramic Coating Burnt Black
FEATURES: - All joints TIG welded for resistance against cracking and wearing
- CERAKOTECeramic Coating Burnt Black Withstand Extreme use Temp. 1,800° F
- Larger Diameter piping for better flow
INSTALLATION: BEFORE STARTING: Your vehicle must be raised a minimum of 36 inches. A floor hoist is ideal. If no hoist is available we strongly urge the use of axle stands as a safety measure. CAUTION! Your truck should not be supported on a bumper jack prior to installing headers, take the time to make a careful and complete header fitting into your vehicle properly. 1. Place the vehicle in an adequately lit location where the floor is solid and flat. DO NOT work on a hot engine. Heat causes metal to expand and makes the removal of fasteners more difficult. Disconnect the battery cables from the battery to prevent electrical damage. Raise the front end for access to the exhaust manifold flanges. DO NOT DEPEND ON A JACK! Use jack stands and block the tires to safely support the vehicle. 2. Remove right and left side wheel wells. 3. Spray Lube or equivalent on all accessible fasteners and fittings before removing them. 4. Remove collector nuts, heatshields and manifold bolts. 5. Starting with the driver’s side, remove the driver’s side manifold through the wheel wells. 6. Using a gasket scraper, remove all carbon deposits and high spots from the head surface. Apply a high temperature sealer to the exhaust pipe flare, to avoid problems due to the lack of space later in the installation.7. While holding the header in place, slide the supplied gasket between the motor and the header. Start the bolts (most restricted first) and washers on the center holes before pressing the header to the head. Tighten the nuts and bolts to the factory specifications. 8. On the passenger’s side, remove the steering shaft and the exhaust manifold through the wheel wells. 9. Must bend tab on right side 90 degrees to clear new header. 10. Like the driver’s side, use a gasket scraper to remove all carbon deposits and high spots from the head surface. Apply a thin coat of high temperature sealer to the exhaust pipe flare, to avoid problems due to the lack of space later in the installation. 11. While holding the header in place, slide the supplied gasket between the motor and the header. Start the bolts (most restricted first) and washers on the center holes before pressing the header to the head. Tighten the nuts and bolts to the factory specifications. NOTE: Due to the material and design on the factory Y-pipe, distortion from its original shape is common. This is caused by repeated heating and cooling of the assembly. This works as a stress-relieving process. This may cause the Y-pipe to not line up perfectly with the header collector. To make this easier, connect the least restricted side first and then force the Y-pipe into place. 12. Reconnect the exhaust system to the header using the hardware provided. 13. Make sure there is adequate clearance on plug wires, battery cables, wire looms, brake lines, coolant lines, etc. 14. Reconnect the battery cables, rechecking everything in the process. 15. Start the engine and let it warm up. Check for leaks. Shut engine off and let it cool down. Check to make sure all connections are tight. 16. When finished with the installation, give your vehicle a test drive checking carefully for any new noises. After several days of driving, re-tighten all the bolts. Note: The items you received are shown in the figure. If you have any questions later, please contact the after-sales staff in time NOTICE: International customers are responsible for all applicable custom duties and taxes in their local country Customs duties & taxes are NOT includedand will be collected by the shipping carrier prior to delivery NOTICE:
|
|
Other Related Items:
Related Items:
For 09-23 Ram 1500/Classic Quad Cab Black 6" Flat Side Step Bar Running Boards $127.88
FOR 09-23 DODGE RAM 1500 5.7L Trucks 2WD 4WD V8 CERAMIC COAT SMOG HEADERS $395.00
For 09-23 Dodge Ram 1500/Classic Black Rear Bumper w/ Dual Exhaust&Sensor Holes $274.88
|